PocketBase is an awesome “ready to go” plataform to build your backend on, and when combining with SvelteKit, you get a fast, flexible and very easy to use stack.
In this blogpost, I’ll walk you through how to set up authentication for your
project. I’m assuming here you’re setting up a new project, but if you have an
existing one, you can follow just as well. Any questions? Reach out at
[email protected].
How to get started
First off, we need to actually have a project. We’re using Svelte 5, with the new
runes syntax.
| |
Installing and configuring PocketBase
Now we need to configure the SDK, which consists of a bunch of built-in functions that helps you interact with the database.
As we are are using SvelteKit, which is JavaScript/TypeScript, we can use the JS SDK.
You can check-out more info in the README of the project to see more info, but here is the gist of it:
In the same folder as you created the project.
- Install the sdk into the project:
| |
- Install the
EventSourcepolyfill to work with realtime connections
| |
- Replace the contents of
src/app.d.ts
| |
This step will help us use the intelisense when using the PocketBase object globally.
- Create your
.envfile.
| |
It will ensure a portable config for our PocketBase server. Copy the
.env.exampleto the root of your project as.env.
- Set-up the
server hook.
The hook will run on every request, acting like middleware. Note the file extension “hooks.
server.ts`”, where the “server” part ensures this runs only on the server.Also, the
PB_APIis a variable that will be processed ONLY server-side, client-side ones needs to be prefixed byPUBLIC_*. More info
| |
- Run your SvelteKit project
| |
Types of authentication in Pocketbase
First off, we need to distinguish between two types of users: admins and superusers.
Superusers
The Super Users are intended to be used in the admin panel, meaning, they
have unrestricted access to all collections (tables) and functions.
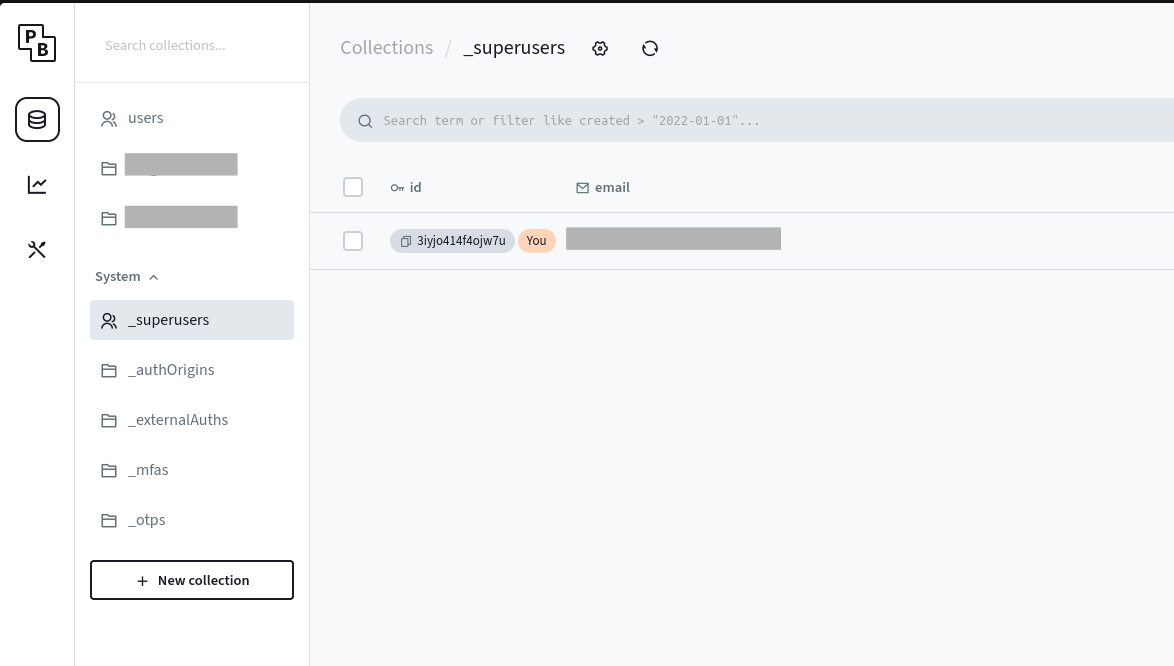
They are stored in the _superusers table, and can be created with the CLI
or via admin panel.
As a best practice, you should never use users from this collection to perform database actions, and UNDER NO CIRCUMSTANCES should you expose an admin token on the client side.
The only exception to the rule, is when you need to perform an action that is not bound a particular user or on behalf of them, but this is always done using server-side code.
Keep in mind that you can’t use OAuth here, as it is intended strictly for internal admin purposes. If you’re attempting to use other types of authentication in this context, you might be targeting the wrong user type.
Users
To understand how users function in PocketBase, it’s essential to grasp the different types of collections available.
Collections are tables in PocketBase with predefined structures. This means you can associate various types of data that may be linked to multiple underlying tables. For example, “attachments” can connect to an internal table to store files and references.
One such case is the Auth Collection, which includes special properties baked
in: OTP, email verification, hashing, internal rules for restricting
sign-ups by domain, OAuth, and more.
By default, when you run pocketbase serve, the users collection gets
created automatically.
Auth collections
Default fields
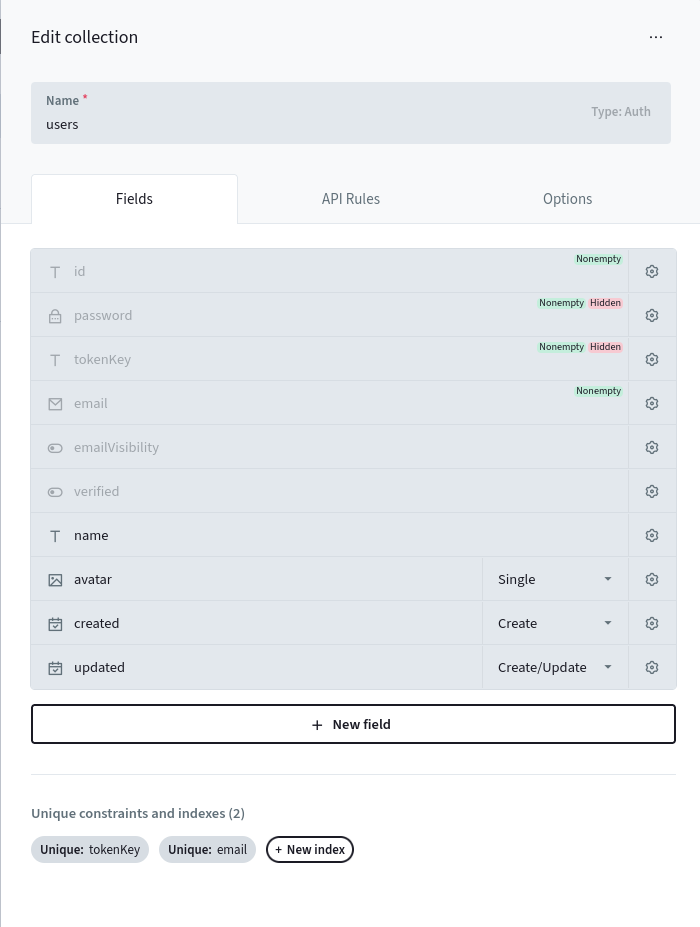
You can see a bunch of “grayed out” properties. Those are the special ones we talked about before. The rest can be edited normally.
Let’s go through each property and what it means:
| Property | Description |
|---|---|
| id | A unique identifier for the user, generated automatically. |
| password | A hidden field that stores the user’s encrypted password, meaning just a hash of it, not the password itself. |
| tokenKey | A hidden field used for authentication token management. It is used to do JWT signing and can be used to invalidate all tokens issued for the user. |
| The user’s email address. | |
| emailVisibility | Indicates whether the user’s email is visible to other users. |
| verified | Indicates whether the user’s email has been verified. |
| name | The name of the user. |
| avatar | A field for storing the user’s profile image. |
| created | The date and time when the user was created. |
| updated | The date and time when the user’s information was last updated. |
API Rules
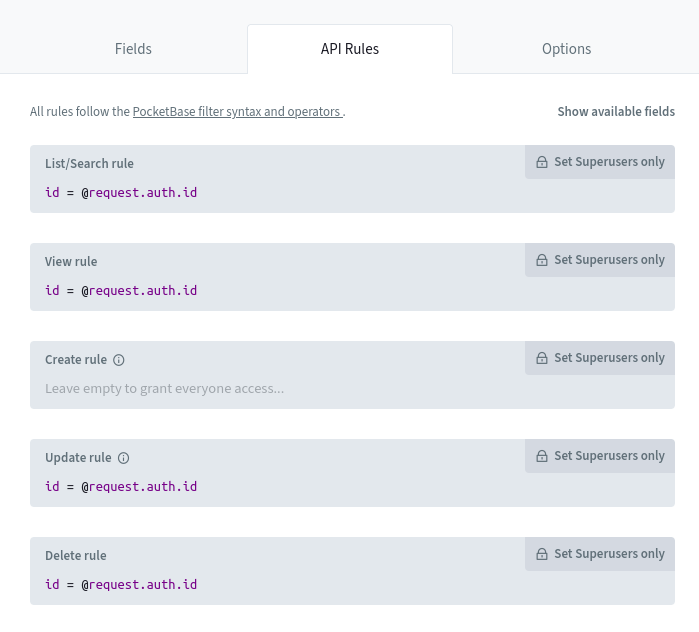
The API Rules specify permissions, determining who is authorized to perform specific actions. While they can become quite complex, they deserve a dedicated post, but for now, let’s outline the fundamentals.
API rules are used to define permissions for CRUD operations, allowing us to control who can execute various actions on the collection’s data.
| Type | Description |
|---|---|
| List/Search rule | Defines who can list or search records within the collection. |
| View rule | Determines who can view individual records in detail. |
| Create rule | Specifies who is allowed to create new records in the collection. |
| Update rule | Controls who can update existing records in the collection. |
| Delete rule | Manages who has the authority to delete records from the collection. |
Example

This means the above API Rule indicates:
only allow the current user to list his own record.
When left empty, as shown for the Create rule in the image, it allows
everyone, regardless of their authentication status, to perform that specific
action.
Setting it all up
By default, email/password authentication is enabled. We’ll cover OAuth and OTP in future posts. And let me tell you, PocketBase has a bunch of them, from e-mail up to OAuth and OpenID, a widely used authentication standard based on OAuth 2.0.
Seriously, take a look:
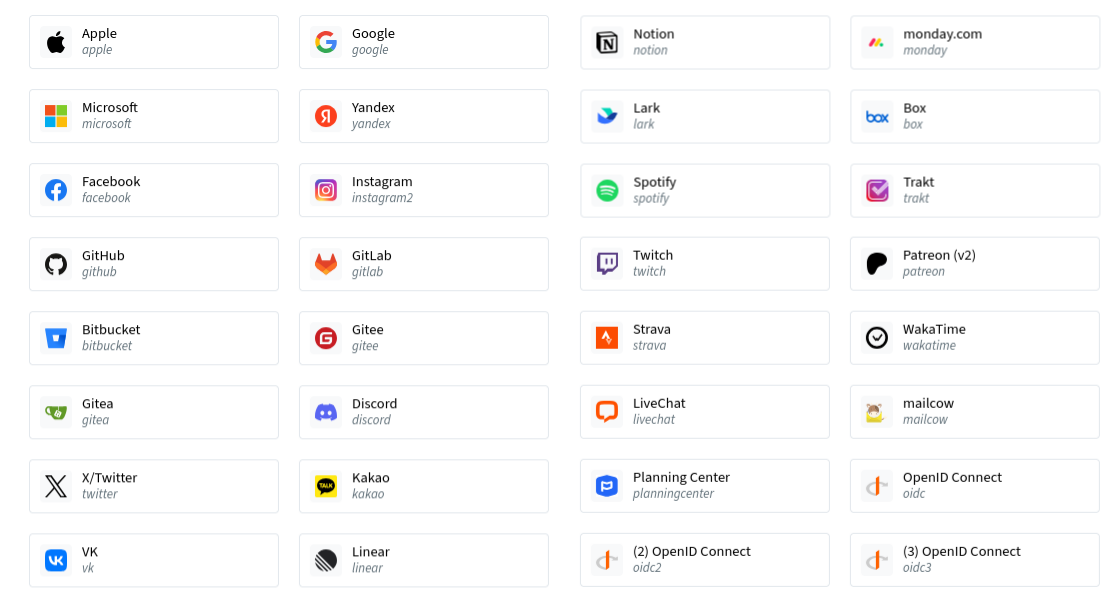
And keep in mind, these are just as of today (oct, 2025). They are alwals adding new ones.
Basically you can connect to “any” SSO under the sun. If not direcly, trough OpenID Connect.
For now, let’s focus on setting up account creation, email verification, and password reset functionality.
The source code for all these examples are in a public repository at:
https://github.com/nathabonfim59/blog-pocketbase-sveltekit/tree/1-authentication
Account creation
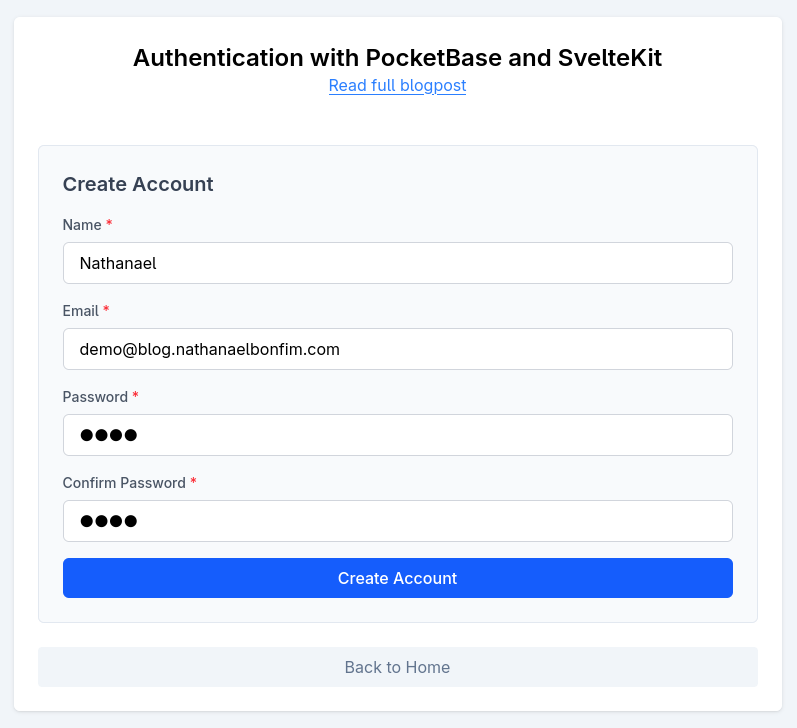
Let’s start with the markup. Here’s the final result. You can use any component library you prefer; I’ve created a few components just for illustration purposes.
Source code
 1
 2
 3
 4
 5
 6
 7
 8
 9
10
11
12
13
14
15
16
17
18
19
20
21
22
23
24
25
26
27
28
29
30
31
32
33
34
35
36
37
38
39
40
41
42
43
44
45
46
47
48
<script lang="ts">
	import Button from '$lib/components/Button.svelte';
	import FormField from '$lib/components/FormField.svelte';
	import Input from '$lib/components/Input.svelte';

	let name = $state('');
	let email = $state('');
	let password = $state('');
	let passwordConfirm = $state('');

	const passwordsMatch = $derived(password === passwordConfirm);
	const showPasswordMismatch = $derived(password !== '' && passwordConfirm !== '' && !passwordsMatch);
	const isFormValid = $derived(name !== '' && email !== '' && password !== '' && passwordsMatch);
</script>

<form method="POST" class="m-6 rounded-md border border-slate-200 bg-slate-50 p-6">
	<fieldset class="space-y-4">
		<legend class="text-xl font-semibold text-gray-700">Create Account</legend>

		<FormField label="Name" for="name" required>
			<Input type="text" id="name" name="name" required bind:value={name} />
		</FormField>

		<FormField label="Email" for="email" required>
			<Input type="email" id="email" name="email" required bind:value={email} />
		</FormField>

		<FormField label="Password" for="password" required>
			<Input type="password" id="password" name="password" required bind:value={password} />
		</FormField>

		<FormField label="Confirm Password" for="password_confirmation" required>
			<Input
				type="password"
				id="password_confirmation"
				name="password_confirmation"
				required
				bind:value={passwordConfirm}
			/>
		</FormField>

		{#if showPasswordMismatch}
			<p class="text-sm text-red-500">Passwords do not match</p>
		{/if}

		<Button type="submit" variant="primary" disabled={!isFormValid}>Create Account</Button>
	</fieldset>
</form>
The important part here is the form. We’re going to use a
FormAction to submit the content
and create the account.
A Form Action is a function that is executed in the server and returns the results back to the client.
This post still in in-progress, I’ll finish it later on but will publish it because it has already lots of useful info.